Wednesday, November 30, 2016

Memento


For my memento I wanted to communicate the feeling of comfort and soft, plush fur that dominates my memory of being young and laying on a rug on the floor in my house hugging my plump cat Hunter. I was really small for my age when I was younger and Hunter's splayed out cat body was about the size of 5-6 year old me; Hunter was essentially a warm, fluffy, living body pillow. 


I made the hand palm-sized fur pillow out of cat fur and thread. First I had to harvest cat fur from my boy Hunter. 

He really enjoyed this part of the project.
I then took the collected fur and rubbed it between my hands repeatedly while waiting on hold during a phone call to make airline reservations. My goal was to make a felted sheet of "fabric" to sew together as the pillow case. 

The fur-matting in progress.
I washed the matted fur sheet with shampoo.

Sewing together the pillow case.
I flipped the pillow case inside out and cut off the top to prep the case for stuffing.

Stuffing the pillow case with extra loose cat fur.
The finished product details:


3D to 2D: Dust Ball House

I took the floating pieces of my memory house map relief and made them into a pattern. I then filled the spaces in between with a photograph of my cat fur memento pillow. The result is a "dust ball house" that resonates with me personally because I have grown up with two cats in the house who shed an extreme amount and fur/dust mixup balls float around the floor of the house. 


Tuesday, November 29, 2016

Map Relief


This segmented map relief records the layout of my childhood home as I remember it at the age of four. The map is essentially a memory space: the pieces fit together but are displayed with space between, almost as if the rooms are floating, threatening to drift away at any moment. Each piece I included in the map of my house correlates with a specific memory in the house. The childhood-crafty nature of the pieces is also related to the idea of a childhood memory; the crafting is child-like, with simple materials and shapes reflecting the boiled-down nature of my memories from that young age. 

My process began with a simple exercise to draw my childhood home with my eyes shut. I was surprised at the results of this activity because what I thought in my mind was going to be a huge, page-spanning drawing turned out to take up only one half of the page. While drawing with my eyes closed the memories of the space in my house were so spacious and the house seemed so large, yet the reality was that the lines came out repetitive, tightly-spaced, with an almost frantic appeal. I am attracted to the way the chaotic squirmy lines fill the corner of the page and decided to explore the idea of a memory space further in the actual map relief. The number I chose to associate and utilize in the map is the number 4 because that is the age I moved into the house I have mapped out, there are four members in my family (meaning four kitchen seats, four places, etc.), and four was my favorite number for the majority of my childhood. 


As a quick three-dimensional sketch I quickly put together a "living room" out of a jagged piece of foam board. I built stairs by covering a paper structure with a gel and water soaked tissues. Because the stairs lead upstairs to the dark and scary loft area, there are jagged, frightening steps and black ink splotches.


With this first piece completed, made other island pieces that would fit around the living room and cut them out of the foam board base. 


 To make the foam board look less like foam board I gave a lot of treatment to the surface of the boards, taking a lot of time to think of ways to represent the unique floorings of each room in the house. When I was younger I spent a lot of time sitting and laying on the floors so I got to them extremely well. Therefore, the flooring of my memory house is very detailed.

Torn paper strips covered with matte gel and layered to reflect wood flooring as I remember it.

To accentuate the cracks and grains of the wood flooring I brushed on some watered-down ink to the paper strips.

The swirly flooring of the utility room reflects the swirls of glues that are put down to hold down carpeting. My dad did a lot of remodeling work in the house and much of the time the floor was bare concrete with the swirls of glue hinting at the previous existence of carpet. This is very similar to how it looked.
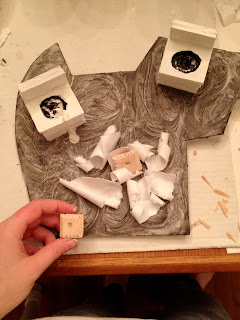
 For the computer room I wanted a large computer screen because my sister and I spent a lot of time playing games on the computer. To make the computer screen I found this shiny inside of a perfume gift box and repurposed it to become the screen of the computer.

The gift box torn apart.
The computer screen attached to the computer room tile flooring.
I added an additional material - balsa wood scraps - fashioned in the shape of Cheese Nips. The washing machine room also doubles as an imagined play space because laundry days were when I remember having a full day to play games with my sister. Therefore the paper scrap pile represents a pile of pillows for pillow forts and the nestled Cheese Nip crackers represent my sister and I, happily nestled in the pillow fort while the laundry churned away.


Monday, November 28, 2016

Balsa Wood Sculpture - Texture


To emphasize the element of texture I constructed a small sculpture with buckets of textures stacked juxtaposing the textures of each other. 

Forming the paper buckets. Putting on a bottom to the buckets was no simple task.

Stacking the empty buckets.
 The idea for the contents of the buckets came from scraps of materials left over from the other two sculptures in the balsa wood mini sculpture series. By filling up the paper buckets with a lot of the same interestingly-textured materials, I achieve supreme emphasis on texture through repetition.

Bucket of splintered scrap balsa wood chips.

Bucket of rolled up and crumpled paper balls (took longer than one would expect).

Final bucket of thin paper slices, much like thin rice noodles.
The shapes of the objects within the buckets all contrast each other in size, shape, and material. In addition, they contrast the smooth paper outsides of the buckets and smooth, carefully-cut hard wooden base of the sculpture.

Sunday, November 27, 2016

Balsa Wood Sculpture - Space

 I aim to accentuate the element of design of space in this architecturally-inspired balsa wood sculpture.
I started constructing the wood sculpture with the idea that I wanted a two-tiered table platform with open space and thin legs.

Attaching the legs to the table involved carving space for the legs and filling with wood glue to permanently place them.
To accentuate the idea of open space I placed repetitious small wood pieces propped up on pins on the upper side of the platform.
 I hung three masking tape balls to the underside.

 And added decorative paper cutout fences to the edges of the upper tier to make a balcony and also to better execute the emphasis on space.


Balsa Wood Sculpture - Scale

To emphasize scale in a 3D format I pit tall twisted ropes against short, stunted ropes of the same unique composition. I put them on a raised smooth platform to add interest and also contrast to the rough ropey texture of the noodle arms. 

I originally started the sculpture with the intention on emphasizing repetition, so I spent hours making braided ropes out of rolled masking tape.  

Masking tape braids
I then dripped yellow wood glue down the length of the braids, coating them to make a visually-interesting texture and also for the practical reason of holding them together. I hoped to bundle the braided tape ropes together but the sculpture was not three-dimensionally strong therefore I constructed a base out of balsa wood, propped up by wood pieces on two diagonally opposite corners, starting me on the path to large versus small contrast in scale. I pinned the two types of braids - long and short - onto the wood and covered the bases in yellow wood glue.

I clipped the pins holding each type of braid to match the braid that the pin held: longer pins hold the tallest braids while short stubby pins hold the shortest braids.
 As a final touch I added smooth masking tape around the bottom of the wood structure. This keeps the pins on the bottom from being too distracting and taking away from the main emphasis on scale.


Hippo Soap Carving

Using the Lion King "Circle of Life Friend" hippopotamus from my childhood, I carved two blocks of strongly scented soap for the first time. 
I was quite frankly terrified of the idea of scraping away chunks of soap because of the fact that once you take away, you cannot add it back. And as someone who makes many mistakes and likes wiggle room, this one-way nature of carving sculptures was intimidating. But I started anyway and I'm glad I did because I found an enjoyable pastime and unique skill that I would like to perfect!

I started with one very fat, purple hippo, but the body was very disproportionately plump so I started with high hopes on my second hippo carving.

I decided to try to make the second hippo the same size as the hippo figurine I was copying to see if that would help me get the proportions right. 


As before, I started with a generic, blocky shape and slowly started to bring out the details. 


The final two hippos carved out of soap.